Do you want to draw a cruise ship? It can be fun! Follow our guide to learn how. We will use simple steps. Anyone can do it!
Who is this for?
Whether you’re a preschooler just starting out or a kid eager to explore your artistic side, this tutorial is perfect for you. Our easy-to-follow steps are designed for kids of all ages, making it enjoyable and accessible for everyone.
Grab your pencils and let’s get started on this creative journey!
Why Practice Drawing Cruise Ships?
Practicing how to draw cruise ships helps budding artists learn important drawing skills. By sketching big shapes and adding details like windows and decks, you’ll get better at using lines and imagining spaces—great tricks for drawing any big object, not just ships! Plus, trying different ways to show waves or puffy smoke from chimneys sparks your creativity.
So, by practicing with fun projects like cruise ships, you’ll be building the skills you need to draw all kinds of vehicles, buildings, and more. Ready to become a drawing explorer? Let’s prepare our supplies!
Materials Needed
Before we start, gather your materials. You will need:
- Pencil
- Paper
- Eraser
- Ruler
- Colors (optional)

Step-by-Step Guide
Follow these steps to draw your cruise ship. Take your time. Enjoy the process!
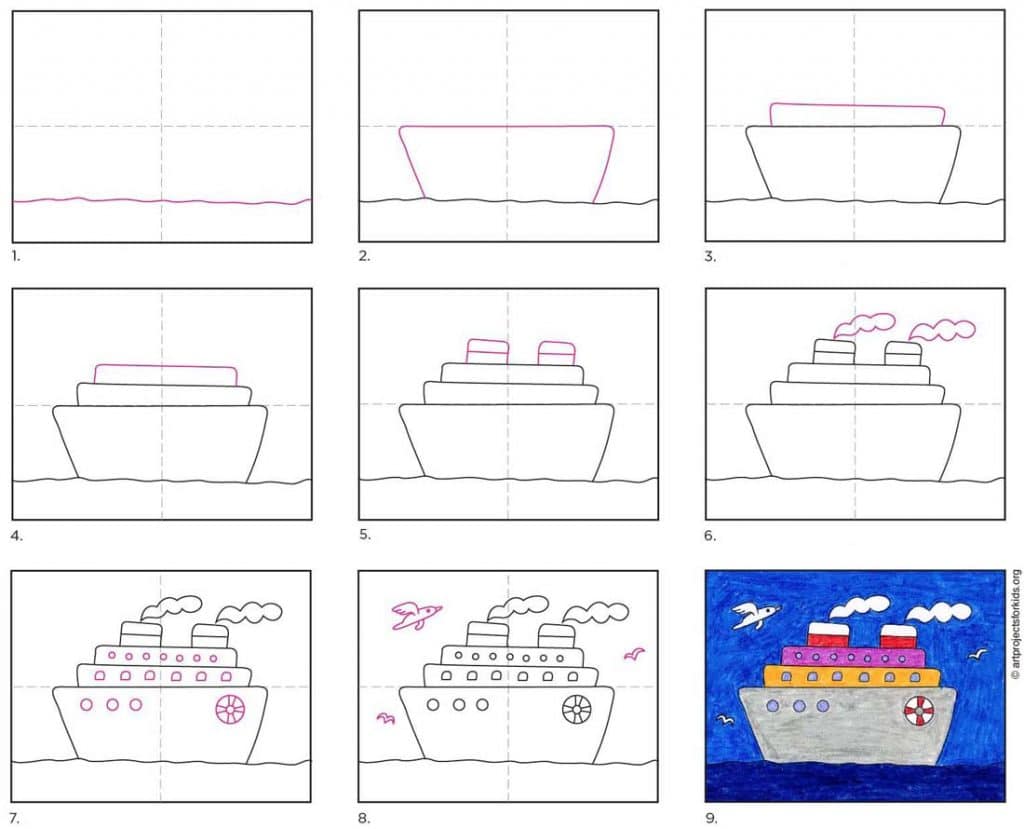
Step 1: Draw The Base
First, draw a long, curved line. This will be the bottom of the ship. Use a ruler to make it straight.
Next, draw another curved line above it. This line should be parallel to the first one. Connect the ends of the two lines. This forms the base of the ship.
Refine the Hull
Let’s make your ship look even more realistic! Carefully trace over the base, adding gentle curves at the front (bow) and back (stern) of the ship. Think about how real ships have pointed fronts and rounded backs—try shaping your lines to match.
To give your drawing extra detail, you can sketch a small anchor near the front, or show the water splashing underneath the hull by adding wavy lines. These details help your cruise ship come to life on the page!
Step 2: Draw The Decks
Now, draw two or three horizontal lines above the base. These lines will be the decks of the ship. Make sure they are parallel to each other.
Connect the ends of these lines to the base. This will give the ship its shape.
Step 3: Add Details
Next, add windows to the decks. Draw small rectangles along the horizontal lines. These windows will make the ship look real.
Now, draw the smokestack. This is the tall part on top of the ship. It releases smoke. Draw a rectangle on top of the highest deck. Add a small oval on top of the rectangle.
To make your cruise ship extra special, use your pencil to add more details to the superstructure. Look at pictures of real cruise ships for ideas! You might spot antennas, lifeboats, or observation decks. Try drawing a few lifeboats along the side, or tiny antennas and flagpoles on the top decks. Take your time and use your eraser if you want to change anything. The more details you add, the more your ship will look like it’s ready to sail the seas!
Step 4: Draw The Water
Now, draw the water around the ship. Draw wavy lines below the base. This will make the ship look like it is floating.
Step 5: Add Final Touches
Finally, add any extra details you like. You can draw lifeboats, flags, or even people on the decks. Use your imagination!
How to Finalize Your Cruise Ship Outline
When you’re happy with your cruise ship drawing, it’s time to make it stand out. Go over your main lines with a darker pencil or pen to create a bold outline. Carefully erase any extra or sketchy lines you no longer need, but leave the details you want to keep. This cleanup step helps your cruise ship look neat, clear, and ready for coloring or display!
Tips for Drawing
Here are some tips to help you:
- Start with light pencil lines. You can erase mistakes easily.
- Use a ruler for straight lines.
- Take your time. Do not rush.
- Practice makes perfect. Keep trying!
Before you add details, try to lay down the basic shapes using gentle strokes. Begin by sketching the main body of your cruise ship—think about rectangles and ovals for the hull and decks. If you want your ship to look extra cool, try drawing it from a slightly tilted angle. This can make your cruise ship feel like it’s really moving through the water!
Try to picture the whole outline of the ship before adding windows or smokestacks. Double-check that your decks and hull line up, and don’t worry if you need to erase and adjust as you go. The more you practice, the more confident you’ll feel with each step.
How Can I Add Shading and Texture to Create Depth?
To make your cruise ship drawing look more 3D, try adding some shading and texture. Lightly shade areas that would be in shadow, such as the bottom of the ship or behind the smokestack. You can use the side of your pencil for soft, wide shading, and the tip for darker, narrow shadows.
For texture, draw tiny lines or dots to show things like metal panels, railings, or wood on the ship’s deck. Notice where the light would hit the ship and keep those parts lighter. This will help bring your cruise ship to life and make it look like it’s really out on the ocean!
Using Reference Images for Better Drawings
Looking at photos or pictures of real cruise ships can make your drawing even better! Try these steps:
- Find a picture of a cruise ship in a book, magazine, or online.
- Notice special parts like antennas, lifeboats, and tall observation decks.
- Look closely at how the windows and decks are lined up.
- Pause and compare your drawing to the picture as you go.
- Add tiny details you see in the photo—this will make your ship look more realistic.
Remember, it’s okay if your picture isn’t exactly the same. Using real-life images is just to help you notice cool features and get ideas for your own creation!
Creative Scene Ideas for Your Cruise Ship Drawing
Want to make your cruise ship picture extra special? Try adding a fun background or setting! Here are some creative scenes you can use:
- Sailing at Sunset: Draw your cruise ship gliding across the ocean with a colorful sunset sky and the sun dipping low on the horizon.
- Busy Harbor Scene: Add some excitement by placing your ship near a lively harbor, with city skylines, cranes, and smaller boats moving nearby.
- Tropical Getaway: Make your cruise ship float near a sunny tropical island, complete with palm trees, sandy beaches, and turquoise waves.
- Northern Lights Adventure: Imagine your ship in chilly waters beneath the dancing colors of the northern lights swirling in the night sky.
- Slicing Through Waves: Show the ship powering through open water, with big, foamy waves splashing against its sides.
- Stormy Weather: For a dramatic touch, draw the ship braving a storm—think dark clouds, lightning, and wild waves.
- Coastal Cruise: Place the cruise ship along a beautiful coastline, with rocky cliffs, ancient towns, or even castles in the background.
- Majestic Fjords: Set your ship sailing between tall mountains and waterfalls, moving through a winding, narrow fjord.
- Colorful Caribbean Port: Imagine your cruise ship parked near a bustling port with bright buildings, open-air markets, and lots of tropical plants.
- Icy Expedition: For adventure, try drawing your ship navigating through icy water, surrounded by giant icebergs.
Pick your favorite scene, or mix and match ideas to make your cruise ship drawing truly your own!
Coloring Your Cruise Ship
If you want, you can color your drawing. Use any colors you like. Here are some ideas:
- Blue for the water
- White for the ship
- Red for the smokestack
- Yellow for the windows
Using Your New Drawing Skills
Learning how to draw a cruise ship isn’t just about ships—it gives you skills you can use for many other drawings, too! For example, drawing long, curved lines for a ship’s base helps you when creating cars, trains, or even submarines. Adding small details like windows, lifeboats, and flags teaches you to look for the special features that make every object unique.
You can take the building blocks you learned—lines, shapes, and careful observation—and use them whenever you draw other things. Maybe you want to sketch a tall skyscraper (those decks help you with floors!) or a busy street with buses and boats. The more you practice, the easier it becomes to tackle new subjects and make all your pictures pop with creative details.
Keep experimenting, and use your cruise ship drawing adventure as a launchpad for drawing anything else you imagine!
Frequently Asked Questions
How Do I Start Drawing A Cruise Ship?
Begin with basic shapes like rectangles and ovals for the ship’s body.
What Materials Are Needed To Draw A Cruise Ship?
Use a pencil, eraser, paper, and colored pencils or markers.
How Can I Draw The Ship’s Windows?
Draw small circles or squares along the ship’s side for windows.
What Are Tips For Drawing A Realistic Cruise Ship?
Pay attention to proportions and details like lifeboats and railings. To complete the cruise ship drawing tutorial, you’ll need approximately 30 minutes. This time frame is perfect for a focused yet relaxed drawing session, allowing you to follow the steps at a comfortable pace. Whether you’re a beginner or honing your skills, this half-hour is just enough to bring your artistic vision to life.
Conclusion
Drawing a cruise ship is easy and fun. Follow these steps and you will have a beautiful drawing. Remember to practice and enjoy the process. Happy drawing!